Anne Marie has had a few home ports and countries. She was built in Cers, France and her first known home was north west France somewhere near Saint Nazaire.
She was sold in 1996 to a German man who registered her in Stuttgart, Germany although she roamed the Caribbean. She seemed to have spent much time in Grenada. In 2005 she was bought to UK and kept at Rye, East Sussex until September 2022. She is now in Sovereign Harbour, Eastbourne on the south coast.
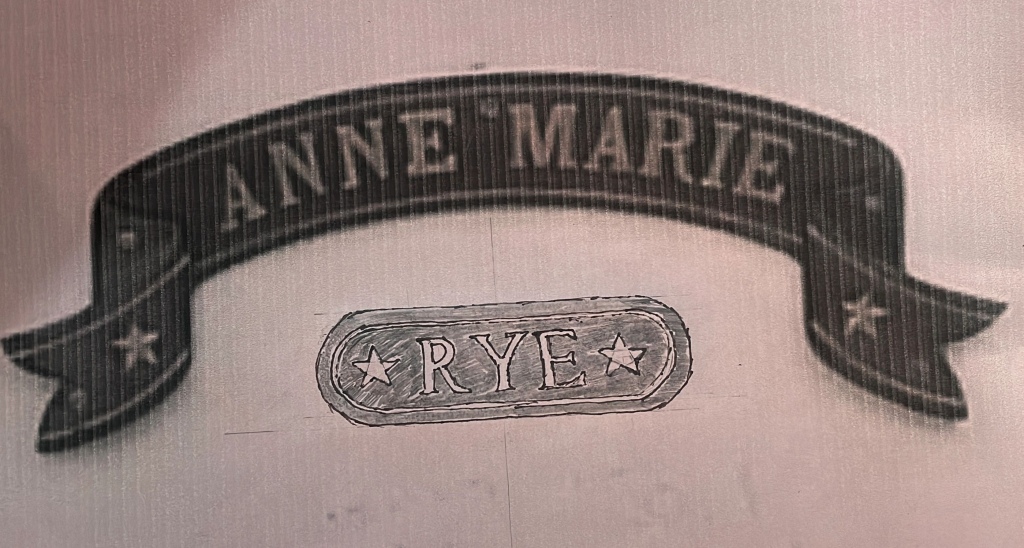
The photos from 2004 after hurricane Ivan show she once had her port of registration carved into a wooden panel on her stern but that disappeared. I decided to make a new home port name plate for her.
Since 2005 she has been moored in Rye and has been registered there with the British authorities. So RYE it is.
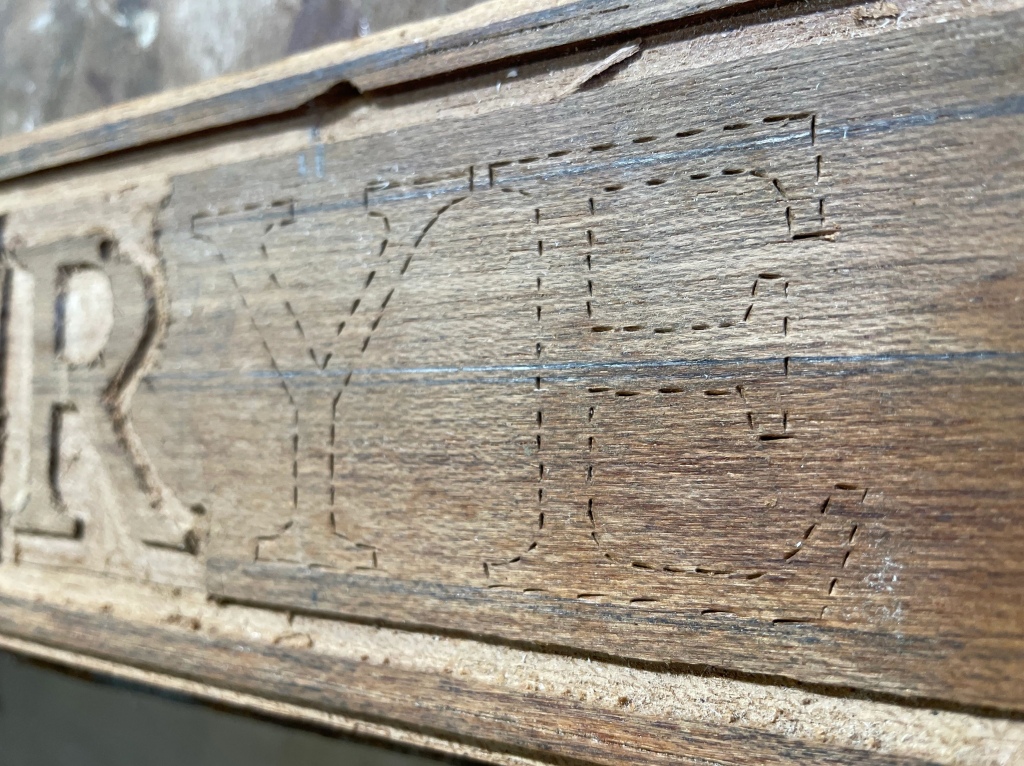
Now I have never carved anything but I was given some router fittings for my Dremel. I had a nice piece of teak from Anne Marie’s refit which became the sign.
Here are photos of how I made it.
Option 1. Straight Option 2 curvedStep 1 – print at right size and stick to panel Step 2 -prick through the paper to mark outline on wood for carvingStep 3 – using the dremel as a router carefully rout the letters and stars. Trim with a chisel. Step 3 – cut the panel to size, lightly sand, highlight with gold and then varnish Lastly, careful to line everything up fix to stern from inside to hide fixings. Lovely.
Well I wasn’t expecting my first post for a year to be this……
When we bought Anne Marie she was high and dry in the boatyard with a broken rudder. The shaft had been bent and the yard owner and sliced through the shaft with an angle grinder. We were told that the rudder had come out of its lower pintle due to constant grounding in the mud berth. The shaft had then bent by the force of the boat, current and mud.
I designed a new shaft and after a lot of searching found the correct sized stainless steel bar. I had it machined and welded, and designed and fitted a new set of bearings and repaired the hull. This is described in a previous post.
But yesterday I thought the top of the shaft looked different and it wouldn’t turn so today at low tide I looked and this is what I found:
Stuck in the mud and bent.
You can clearly see that instead of being nice and straight the rudder is bent sideways. So I have booked a slot at a neighbouring yard’s drying area for two weeks time. I will remove the rudder , making sure the boat is leak-proof and start the repairs. I will also try to drop it further back tomorrow so that the bottom of the rudder is not in the mud (good luck with that).
The two Lewmar self-tailing winches in the cockpit of Anne Marie needed repair as they jammed whenever they were used and the central spindle was loose and could be removed without effort. They are probably 40 years old and the casting had corroded. Rather than spend many hundreds of pounds replacing them I decided to fix them.
This diagram shows the basic layout of the England 30 but without the self-tailing top.
The central spindle is normally held in place with an 8mm thick half-moon plastic key (No 10 in the diagram. Because the half moon key has worn away the central spindle could be removed. Lewmar sell a new key but being tight-fisted I decided to make my own. How hard could it be?
I had, within my ‘garage hoard of useful stuff that might come in handy one day’, a 50mm diameter bar of acetal. I had previously used part of it to make some new sheaves for the mast. I cut an 8mm disc from it and drilled out the centre using a hole saw. I starting by cutting the outside diameter of the spindle and then drilled the centre to the diameter of the central spindle key-way (just above the number 8 in the diagram). I then had an 8mm thick doughnut of acetal.
Using my trusty Swiss Army knife I then cut a slice out of the ring to the right size and shape. I inserted it into the casing of the winch and hey presto the central axle no longer comes out.
To solve the jamming problem I debated whether to add a spacer at the point where the problem occurs but then I remembered that there are two spacers (at 9 in the diagram) already in the winch. Removing the yellow one lowered the whole affair by about 2mm which solved the problem. With just a little bit of my time and some imagination I learned about winches and gave them a new lease of life.
You can see the red and yellow spacers here. Removing the yellow spacer allowed the drum to drop sufficiently so that when the self-tailing feed was fixed in place the drum could move freely. You can also see the new white acetal wedge in place which prevents the central spindle from being withdrawn.Drilling the pilot outside of the wedge in the 8mm thick acetal The new acetal doughnut shown against the original. This shows by how much the old wedge had worn away.The finished article.
It’s 6th June 2020 and no longer do I have to disconnect the engine control panel when I leave Anne Marie. I have fixed it in place because today I have fitted the weather cover.
When we bought Anne Marie in 2015 she was out of the water and very poor condition. Like everything else the masts and booms had seen better days however replacing them was out of the question financially so repair was the answer. The main boom was built for slab reefing where you reduce sail area when the wind rises by dropping the main and setting less sail area.
How slab reefing works: Reduce the amount of sail by bunching the bottom slab along the boom. You reef a sail in strong winds to make the boat sail better and safely.
Slab reefed sails have a set of eyes built in in two or three layers , one at the front by the mast (the luff) and the other at the rear (the leech). This sail is lowered down to the point where the first eye can be looped onto a hook at the front of the boom. The eye at the back of the sail has a rope through it which you haul outwards to fix the sail in its lower position. This rope goes from the sail to the back of the boom and is threaded inside the boom along its full length coming out at the front by the mast. Generally there are clamps at that point for tying the out-haul therefore fixing it in place.
You can see from the photos that the clamps on our boom were heavily corroded. So much so that they would not budge and the only thing to do was to drill them out and remove them. Try as I might I could not find any replacements so recently my family gave me three stainless steel cleats which I have fixed to the boom and these will enable me to haul on the ropes and tie them off.
Original system
Original clamps with one removed
I measured it just in case I could find a replacement.
One of the things you have to do when refurbishing a boat is to create a ‘boat manual’. In this you have stuff like the ships papers (ownership/insurance etc) as well as the instructions such as –
How to start and stop the engine.
How to fill up with fuel / water and not get the two mixed up.
How to use the toilet (heads) and empty the holding tank by pumping it out in a yard or at sea and what the rules are about doing it.
How to dismantle the toilet when it gets blocked!
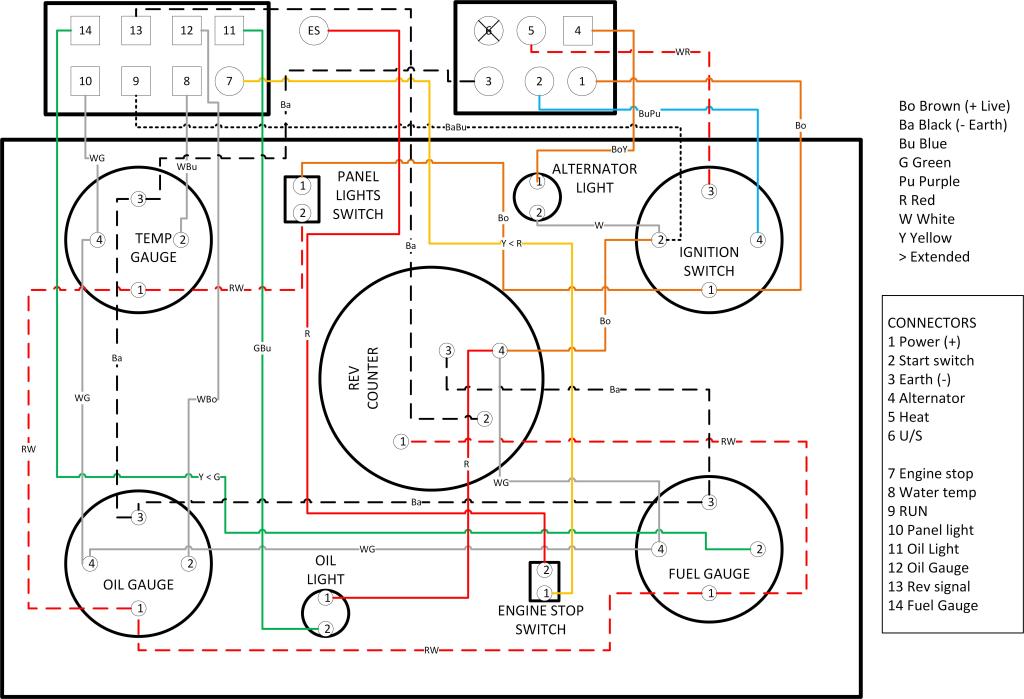
One thing I have had to do is create a wiring diagram for the whole boat. Now I haven’t got far yet simply because there is no wiring except for the engine systems. At the moment this is the engine control panel and I needed to turn it into a paper diagram.
Panel after removal and before prettying up
Panel mid-way through renovation
Rear view – how to sort out this?The wiring diagram – all my own work! Pretty good eh?
Mind you although it took a lot of time to do all it actually looks like is a jumble of lines on a piece of paper. Hands up who actually understands it.
It has been a frustrating period for rebuilding Anne-Marie but every so often I achieve a little bit here and there.
So over the last few days I have been putting Colean on the cockpit seat timbers. We have replaced all the wood and it is now ready to be re-installed. However I have discovered that one of the lids which is Fibreglass has cracked and is very weak so before I finish it I am going to have to strengthen the lid.
Today I have installed the front anchor hatch cover. Tomorrow there will be a bit of varnishing to do just to tidy things up. I have also hopefully sealed troublesome leak in the deck
The main boom is on the mast again but I can’t fix the topping lift until I climb the mast. It turns out that the Triatic stay which I had not yet connected has twisted around the topping lift and I can’t get to it without planning the mast.
One bit of really good news is that I have discovered how to connect up the water heating system. I have discovered that the two blanks beside the top of the thermostat housing are actually access points for heating. I shall take one out install a connector and plumb the heating in. Things are a lot easier when you open your eyes.
So its been a while but I am back working on Anne Marie at last. The converted bank is now a fully functioning office and so time is much more available for the boat.
What has happened to Anne-Marie in the last year? Well not a lot actually. She has gone up and down with the tides and every now and then I went along and got the engine going and reminded her, and me, that she is not forgotten and there is still a lot to do. She is however looking dirty and green. I have scrubbed the green coach roof! It is now white-ish again.
Shore Power
We are just about finished with the installation of shore power and 240v electrics although there is one more bit of work to do to finish that off. I have decided to put in 32 amp system rather than 16 amp to cater for large items of electrical equipment that I might add in the future.
Rebuilt and connected
power cable male end
Female boat socket in cockpit
New 240v control panel
I have used a Marinco socket and plug at the boat end as I thought they looked the most robust and watertight, which I think they probably are. Little did I know that they also have build problems. The ones I got just would not fit together however much I tried. Eventually I dismantled them both (male and female connectors), analysed the problem and then rebuilt them so they worked. At about £150 I was not very impressed especially when neither Marinco or the UK supplier answered emails and queries.
Needless to say the other shore power equipment will not be Marinco.
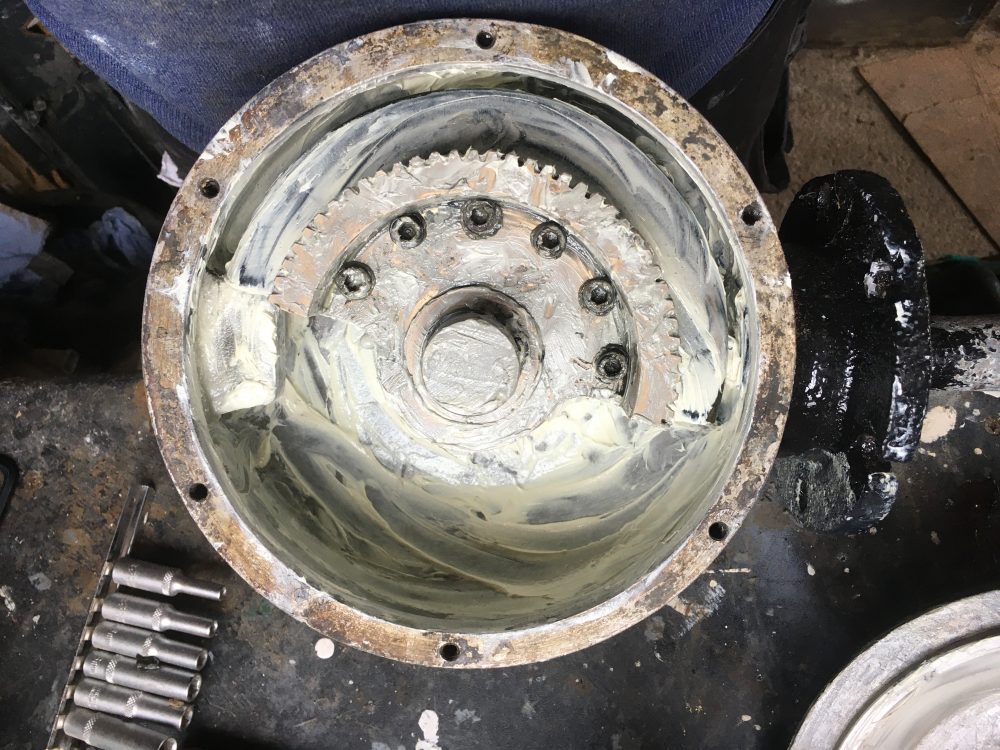
Steering gear
I removed the wheel, pedestal and connections to the rudder way back in the early days. It required a lot of work to make it look good. I have now got round to the internal workings of the rack and pinion gear which was very stiff. I was rather worried as the rudder was damaged back in 2010 or so and it might have bent the steering pedestal shaft.
I had to make a new bearing for the top of the pedestal. When I say I, I mean Chris the marine surveyor. I had hoped that YouTube or the interweb might have helped with identification and a diagram for maintenance, but no. Too old and unidentifiable. So I went in ‘blind’ and used my ingenuity.
New acetal bearing
Rack and pinion gearbox before refurb
Original steering before removal and refurb
Inside of rack and pinion after cleaning and greasing
Rack and pinion gear box cover
Pedestal shot-blasted before painting and new rope cover to wheel
Luckily the main cover bolts came out easily – someone had greased them in the past. I removed the rack and pinion steering gear and then cleaned it up, freed it a little and re-greased it. This is now ready to go back into that boat. The only bit I couldn’t get at was the top bearing which unfortunately was the main problem. Stainless fixings in an aluminium casing had done its usual trick and corroded over the years to such an extent that the fixings would not budge.
Engine stop solenoid
I have been relying on a piece of string to stop the engine which really isn’t very satisfactory and I have been looking for an electronic solenoid activated by a switch on the control pane. I eventually bought it from China (where else?) on eBay with a 1m long control wire. This I could mount in the engine compartment and align the wire through the engine so that it attaches to the engine stop lever. When I press the toggle switch on the control panel the solenoid activates and pulls the wire about 40mm which is enough to stop the engine. When I release the switch the wire extends back toi its default resting position allowing the engine to start/run.
Now this should be easy but as usual there was a twist. Having ordered a “pull on activation” solenoid I was sent an “extend on activation” version. This meant that the fail safe position was ‘engine stopped’ which is no use at all. Contacting the seller got a reassuring ‘yes I will send a replacement’ which never arrived so I decided to have a go and fix it. How difficult could it be?
It turned out to be more complicated than I thought but after a lot of puzzling I turned the circuit board 180° and swapped the power leads to the motor + to – and vice versa. Hey presto I now have a ‘pull on activation’ solenoid. I have just ordered a couple of wire clamps and then that will be fully operational.
I did have to add an extra wire to the loom from the control panel as there was only one spare but that’s no big deal.
The Stop Solenoid with easy to understand instructions
I can’t believe that we launched Anne Marie a year ago. What a great day that was.
I will be getting back to work on her fitting out in October. Since December I have been renovating our new offices which are now finished bar the snagging.
She is not quite as clean now but that’ll soon change.
We have already agreed our first cruise for June 2020 with friends in Port Solent so let’s get going.
I cannot believe yet again I have missed most of the best weather for getting Anne Marie ready and then sailing her. We have, at least, had the 240 V shore power system installed thanks to our friend Chris but that is about it.
Over the last eight months I have been renovating an old bank building to turn into offices for our business and we moved in about fortnight ago. Another two weeks will see the job pretty much finished so when September turns up I shall be back getting Anne Marie ready.